Fire pits are great places to gather around and enjoy roasted and grilled food with friends and family. They are the best places when you want to break the monotony of the fireplace inside the house.
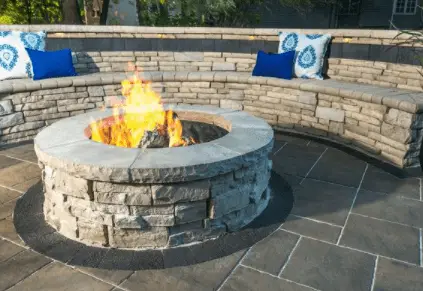
Having a fire pit can go a long way in adding ambiance to your outdoor living space, especially when built at the patio.
Building a fire pit may sound like an expensive affair, but the truth is that, you can easily build a fire pit even without taking so much of a toll on your budget.
That heap or rocks you gathered when planting your lawn is the very raw material you need to make a fire pit. And the best thing about it; you do not need a contractor to do the job for you.
How to Build a Cheap Fire Pit – Steps
With these easy and simple steps, you can make your fire pit and save the money you would have used to pay the contractor.
1. Determine the location of your new fire pit
The first step in building a brick and rock fire pit begins by checking the building codes as laid down by the homeowners’ association municipality. This is because fire pits fall under the building codes that are different from state to state and from city to another.
Some cities may allow the building of fire pits while others may not. And even those that do allow, some strict guidelines govern the building of fire pits. They may include a certain distance from neighbor’s and your property and utility lines, use of certain or specific fuels among many others.
Usually, most municipalities recommend that fire pits be built 15 feet from neighbor’s residences and 10 feet from your property. The area should also be devoid of any structure, and there should be no overhanging trees.
At the same time, you have to choose a location that suits what you have envisioned. In this regard, it must be an area that has enough space for chairs around the fire pit.
2. Have the location inspected for utility lines
Checking and confirming your locale’s building codes is not enough; they cannot tell what lies under your property. The lush green grass you see in your backyard could be covering critical utility lines that carry gas, water, sewer, and power.
Interference with such lines could result in unnecessary hefty repair costs and worse still, accidents. This is the reason for which you have to contact the utility company for a go-ahead. You do not want to prepare with brick and rock fire pit materials only to discover that you are not allowed to do so.
3. Make a list of the items you need
With a clean bill of health, now you can proceed with the project. Begin by making a list of the items you need for this project. Making a list of the items required saves you money because you will be buying things from the landscape supplies in bulk.
At the same time, you are saving so much time since you do not have to keep going back to the store because you forget some things.
Among the things, you need for this project include cement, sand, gravel, geotextile fabric, rebar, and rocks or bricks. Most of these items are cheap and readily available at the landscape supplies store, while others like rocks are within the property.
Mark the shape and size of your fire pit. Before you start marking, you must have decided on the size and shape of your brick and rock fire pit. Although there is a wide array of designs and sizes to go with, I would go with a circular 36-inch diameter fire pit any day.
Hammer a piece of rebar into the ground where you wish to have the fire pit. Tie an 18inch string on the rebar and move around marking the ground with landscape spray paint.
4. Excavate the dirt
Now that you are sure no utility lines pass underneath the location, it is now time to remove the dirt. Hold a shovel with both hands and one on the metallic part; apply some force to drive it 8 inches into the ground. Bend it a little and scoop the dirt.
Repeat this until you remove all the dirt starting along the edges, working your way towards the center. Reduce the length of the string short of the fire pit wall, move around marking an inner circle. For example, if you want your wall to be 2 inches thick, then you should reduce the string to 16 inches for the inner ring.
But even as you do this, ensure not to shake the foundation soil because this would weaken the foundation of the fire pit. Remove the bumps at the base of the fire pit by scrapping it off instead of digging to avoid interfering with the foundation soil.
Instead of discarding, you can carefully remove the turf and use it to replace the thinning patches of lawn grass.
5. Compact the ground with sand and gravel
Using a level, ensure the bottom of the pit is even. If it is still bumpy, keep scrapping the bumps until the ground is level. Use a hand tamper to compact the ground for a strong fire pit foundation.
Then pour in some gravel and compact it using the hand tamper. Gravel is a great option for maximum drainage during the rainy months. Then add a thin layer of sand, spread and compact it to make the ground even more compact when the sand settles in the spaces between the gravel particles.
Mix cement, sand, and gravel in the recommended ratios and pour the concrete footing on the already marked fire pit thickness. Cut some 2-foot pieces of rebar and place them on the footing then add the concrete mix until they are completely submerged.
The pieces of rebar are meant for strengthening the fire pit. Then leave the concrete footing to dry overnight so that you can build the fire pit wall the next day.
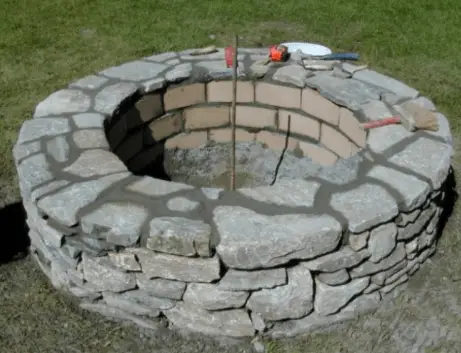
6. Begin building the bricks
Place some cement and sand motor on the footing followed by rocks and bricks, depending on your choice. On one edge of the first rock, put some motor and flush another rock against it.
Repeat this step laying the rocks along circular footing. Do this with the other courses but do not let the motor gap of the lower course lay in line with the upper course. But as you do that, remember to leave four gaps at the lowest course and use some rocks to support the upper courses.
The gaps are designed for draining water during the rainy seasons. Having done that, you might want to finish your fire pit by applying plaster on both sides to make it more appealing. Paint the inner side with black stove paint for maximum heat retention. If necessary, ensure to paint the exterior with bright colors to reduce heat loss