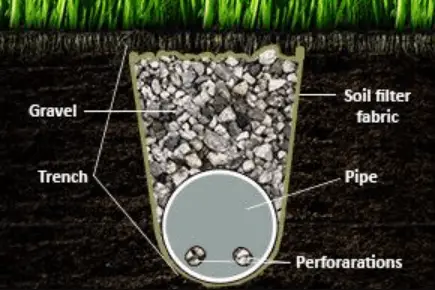
A French drain is a great reprieve for pooling water or runoff in a yard. Water collecting at your foundation or not draining properly from your patios or driveways can lead to damages in your yard and other problems such as mosquitoes, mold and slipperiness. Let’s take you through steps for installing a French drain yourself.
How does a French Drain Work?
A French drain is an underground trench or pipe installed to collect standing water in the yard and redirect it to a different location of your property. French drains are good at resolving pooling water or water runoff issues that are likely to damage your property.
This underground trench is usually covered with sod or gravel and designed to slope in a manner that the end is lower than the mouth. French drains can also be disguised as dry creek bed to blend with a landscape. At the exit, the water can be collected in a dry well, a suitable rain garden or into a large swale.
When installing the drain, there are some regulations and recommendations that need to be observed. For example keeping it at least a foot from your foundation and at least 10 inches below the base elevation of your home.
Your local municipal authorities may also have a say on your project. Before you make any plan, confirm with your local building and zoning authority who may want to do some inspection before the project kicks off. It may also be illegal to direct water runoff from your property into storm water systems.
Materials you’ll need for French Dain Construction

- A shovel for digging
- Commercial grade landscape fabric
- Landscape fabric staples for pinning the tarp
- Crushed granite or lime rock for backfilling the drain
- A tape measure for taking measurements
How to Install a French Drain – DIY
Here are the construction steps for a French drain.
1. Choose the location where the drain will run
After gaining all the approvals, determine where your trench will run and end. Establish where the water will be channeled to without affecting anyone’s property. Consider the distance from your foundations and other hard surfaces in your yard. Let the trench not interfere with traffic and your recreational areas.
2. Check the slope and create where the water will be collected from
The point where water is collected from should be higher than where it is going to. Make the opening or mouth where the water is pooling at. Let it be wide enough to enhance water collection. Alternatively, you can position the drain in a manner that water enters it from any point for its entire length.
3. Dig the trench
Mark a straight line running down through the center of the planned drain. Using your shovel, start digging as you cut straight on either side of the marking as you remove sod to a width of 9 to 12 inches. Create a V shaped trench with a depth ranging from 10 to 18 inches. Ensure it is sloping towards the exits.
4. Line the Trench with a Fabric
Line the trench with a landscape fabric and secure it with landscaping staples on either ends. Fold back excess fabric to both sides of the trench. While lining the trench, consider using a continuous swatch otherwise you may overlap the pieces in the direction of the desired flow. A filter fabric helps in keeping your French drain clean and free from debris.
5. Hook up to Inlet pile
Install an inlet grate at the mouth of the trench. You may add a perforated drain pipe to the bottom of the trench although this is optional. It is not mandatory for a French drain to have a drain pipe in order to function effectively. After connecting to inlet, test the flow of the drain by running some water from your garden hose.
6. Fill the trench with Gravel
Fill the trench with drainage gravel or your crushed granite. You may decide to make your drain more visible or invisible. Do not fill the drain completely to the top if you have plans to add some top soil and sod which will completely cover the drain. Otherwise fill it to the top if you plan to have the stone exposed.
French Drain Maintenance
A well-constructed French drain will serve many years without a problem. However, to ensure everything is running well, clean the inlet and outlet points in a regular basis to remove debris so that water can move freely. If your French drain gets clogged, you may have to dig up a part to do the repair.
Final Thoughts.
Before building a French drain, try to find out the reason for standing water in your backyard. If it is a damaged water pipe, a repair should be done. Check around if there is anything blocking your drain systems and water ways. If you don’t find any problem, then chances are your properly is located on receiving side of the slope and installing a French drain remains the best option.